What was once seen as luxurious is generally viewed as commonplace within a few years and then subsequently taken for granted. Look at the switchgear of a modern bike and marvel that so many functions can be controlled by so few buttons and sliders.
This is evolution for you and in this instance the ubiquitous microchip will probably be doing its bit unseen somewhere. Yet progress is an iterative process and occurs in step changes.
Fifty years ago the British bike industry was only just waking up to the idea that customers wanted ease of use and not nasty cheap tat. Switches had historically been of pitiable quality, badly made, poorly sited and only semi-reliable. The nascent Japanese bike industry had shown the way; even the smallest machine was beautifully equipped with cast alloy switches that the rider could access with little or no thought. Even better they were well made, reliable and weatherproof.
For some unaccountable reason dealers used to have shelves groaning under the weight of spare switches and as recently as just five years ago it was still possible to pick up New Old Stock switchgear for a few quid. Refurbishing what was on your bike simply didn’t make sense; times have changed and yesterday’s worthless junk is now today’s tired treasure.
The Guide
 |
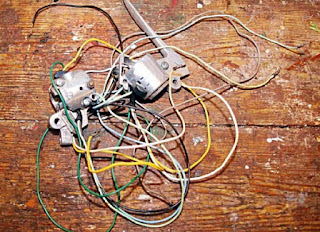
| Not pretty by anyone’s standards. The outer sleeving has hardened and flaked off, connectors are missing, lose or corroded, the alloy is badly oxidised and the switches stiff or seized. |
 |
| A must have when working on switches; all the screws, clips and springs stay in one place. For the brass components lidded trays or pots ensure stuff doesn’t go missing... spares are not on any dealer’s stock list! |
 |
| It’d be tempting to start prodding and poking looking for an easy fix but resist. Don’t take anything apart until you have a photographic record and a sound knowledge of each set of components. This wiping contact switch contains springs, balls, insulators and brass pads and needs careful handling. |
 |
| Never underestimate the power of dedicated electrical switch cleaner; it can work miracles. Where heavy corrosion or verdigris is present gentle controlled abrasion with a needle file first will help. |
 |
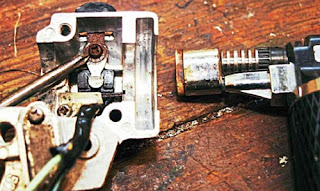
| Internal screws often seize and need considered removal. Penetration fluid is the first call but often heat is needed. A micro gas torch was carefully directed on the screw head and we got a result but do this outside with plenty of ventilation. Most easing fluids are ultimately flammable! |
 |
| Inside and up close these are the key components of a typical lever-operated sliding switch. Note their position and orientation before attempting to clean them. |
 |
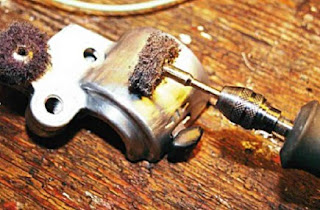
| Abrasive nylon micro mops are the tool of choice to remove the worst of the oxidation. Working from coarse to fine soon gets results. Plastic knobs should either be removed or protected with strong tape. |
 |
| T-Cut then your preferred aluminium polish should get the switch cases to original condition or better. Low pressure and high speed seems to give the best results. Old clothes and safety glasses are a good idea, this is messy! |
 |
| And to give a bit of protection the alloy gets finished off with a quality metal polish that also inhibits oxidation. |
 |
| If the original wiring is still flexible it can be reused; if not fit new. Never reuse old connectors, use quality cutters to trim wire and ensure it’s not corroded. Use a proper crimping tool or the connector will fall off. |
 |
| New sleeving installed and secure under the gold coloured grip. Use a multimeter to ensure both the correct function of each switch and that you have minimal resistance. |


