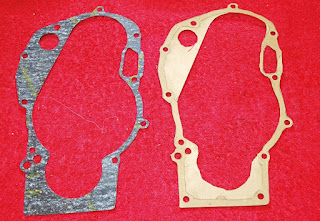
Like it or not the days of finding cheap, limitless supplies of Japanese new old stock parts has gone. Even some key service items that would have once been stored by dealers in reasonable volumes are now thin on the ground. While lots of worn parts can and will need to be restored and not simply swapped for new, when it comes to things like gaskets many of us could soon be left high and dry. Or possibly not if we follow the lead set by our British biking cousins. These chaps have been making gaskets for old bikes for decades; some out of necessity, others because it’s cheaper.
The reality of the situation is that if you can find good quality aftermarket kits then it makes perfect sense to use them. The caveat here is – good quality. Many kits are fine; some are so-so while a significant number are ill-fitting, poorly cut and sometimes downright wrong.
 |
| Tools for the job |
 |
| If there are dowels in the gasket surfaces they need to come out. Most are parallel but some are shouldered. Here each one is marked with a code so I know where it goes and in what orientation. |
 |
| On the unprinted side of the gasket paper a facsimile of the case has been created via the grease. I’ve traced around the outer profile and hand-drawn the inner for clarity and ease of access. |
 |
| Assume nothing! If in doubt don’t cut until you’re sure; I mark any suspect areas with an X. Using a medium hammer and punch the obvious holes are cut out. |
 |
| In some instances it may be necessary to trim in-situ. Wherever possible do this up against unpainted surfaces for obvious reasons. |
 |
| I need a large hole here for the end of the gear selector shaft.A pencil rubbed over the gasket provides a rough outline I can then use to locate a suitable socket to draw around as a template. |
 |
| And there we are one pattern gasket and one homemade in modern gasket material. Either will work but I’ll be saving the grey one for emergencies just in case. |


