Louder, faster or just a replacement – fitting a new exhaust is easy with some handy pointers. This is how to do it properly...

The Guide
 |
| Free those fasteners : In advance (ideally by a few days) treat all the fasteners with penetrating spray – such as Silkopen or Plusgas. The biggest problem area is header bolts/nuts. If you’re able to run the bike, start it, allow it to idle, and use a secure-fitting tool on the header fixings. Work back and forth, don’t force it – if you can tighten/loosen alternately, it’ll break down any corrosion. And mind you don’t burn yourself. |
 |
| Locate exhaust valves and sensors : Allow the bike to cool. Loosen bolts, nuts and clamps holding the silencer(s) on but don’t fully remove them. If you have an exhaust butterfly valve, disconnect the cables at the exhaust side. If the valve’s not retained on the new pipe, remove from the servo (and the servo itself too, if possible). Fully remove the fixings and then the silencers. If the bike has exhaust sensors, find their electrical connectors and unplug them. |
 |
| Take the strain : If the headers and collectors are very big and heavy, place a block or jack underneath to support the weight. Undo the header bolts fully, and remove them. Remove any remaining bolts supporting the headers and collector, and lower them from the bike, being careful not to let them drop, squashing fingers, damaging themselves or other parts. |
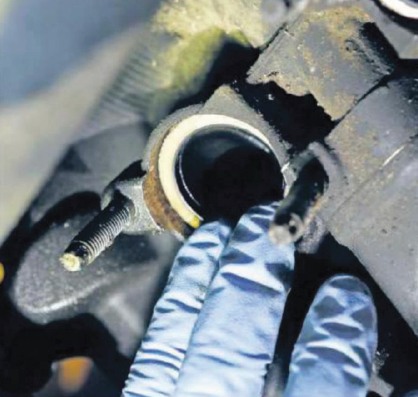 |
| Check those gaskets : If the bike is only a few months old you may be able to reuse gaskets, but generally it’s best to spend a few quid on a new set. Clean all threads with taps/dies/wire brushes, and apply anti-seize compounds. If you’ve even slightly rounded any fasteners, or they’re really rusty, replace them but never fit stainless bolts to an aluminium cylinder head casting. |
 |
| Check everything fits : Lay out your new parts and be happy with what goes where. Fit new gaskets in the exhaust ports (a dob of grease will stick them in place). Loosely fit the headers, then the collector if it’s not a one-piece front section. Finger tighten the head bolts, ensuring each pipe seats in the manifold. If the joins are tight, gentle wiggling and a light tap with a rubber mallet should help. |
 |
| Springs into action : Fit the link pipe (if it’s a separate part), and then the silencer – still finger-tight. Give all the joins a wobble and a twist to make sure every part is fully seated. If the system is held together with springs, use a proper spring puller to fit them – not pliers. If you don’t have one, a large robust cable tie looped around one end is a safer way to stretch and fit them. |
 |
| Torque up and clean up : Torque header bolts up first, then any centre section clamps and silencer fixings. Check the fit one last time – adjust if necessary. Fit heat shields, then any mechanical parts you’ve removed for access. Break out a clean cloth and a bit of spray polish, WD-40 or whatever, to wipe off grease and finger marks. If you leave them, they’ll stain the exhaust when you run the bike up. |
 |
| Make the necessary adjustments : Run the bike up to temperature, checking for leaks and blows. Stop the bike and resolve any problems, and if your bike has a fairing or bellypan, refit it and check the clearance. If it touches, you may need to re-check the exhaust is correctly aligned, space the bodywork out for clearance, or modify the panel in the case of aftermarket race fairings. |
 |
| And finally... : If you can’t get a finger between a pipe and panel, consider fitting heat-resistant tape or matting to the inside of the bodywork. Some bikes will not need fuelling adjustments with an aftermarket exhaust but at least 90% of bikes won’t be at their best if left unmodified – cough up an hour’s labour for a dyno run with an air/fuel ratio check. |