This Yamaha RD125LC’s nose fairing is typical of the plastic that’s found on many 1980s and ’90s sportsbikes. An over-exuberant former owner slung the RD up the road, leaving the fairing covered in deep, ugly scratches. It looks a mess on the bike, so it was resigned to a life in the loft thereafter.

Repairing it, though, is a relatively easy process that doesn’t take long. It’s also a far superior option to buying a cheapo glassfibre replica or a ludicrously priced NOS item.
Priming, spraying, applying decals and lacquering the finished article are all vitals skills of the seasoned restorer, but important work has to be done first before the finishing touches can be applied later on. So if your fairing is looking scratched or damaged, here’s how to repair it and get it ready for priming.
Tools for the Job : Three grades of sand paper (40/80/180) – the amount you use will depend on the size of the area you’re dressing. A sanding block. Filler, hardener and a spreader. A heat gun or hairdryer. A screwdriver and spanner to remove any panel ancillaries. A dust mask and goggles to keep any dust/ fumes out of your eyes and lungs.
Cost : The only real cost you’re looking at is for the filler, hardener, sandpaper and possibly a sanding block. We used U-Pol Easy 1 fi ller and T Filler hardener which comes as a kit (3.5 litres of filler, two tubes of hardener and a spreader for around £25). Sandpaper will cost less than a fiver all in, and sanding blocks can be had for a couple of quid. In total you’re looking at around £35.
 |
| Remove all unnecessary trim from the panel you’re working on to prevent it getting damaged. In this case, with a fairing, take off the screen, the bead trim that runs around the fairing’s outer edge, and the internal mounting brackets. |
 |
| We want to apply the filler to a clean surface, so remove the decals. Factory decals stick like limpets so they’ll need heat to shift. A hairdryer will do if you don’t have a heat gun – apply heat to one of the decal’s solid edges, then slowly peel it away. |
 |
| This fairing is a mess, with deep scratches and spikes of impact melted plastic. We need the area to be flattened and keyed so the filler can find purchase. Rub down with a rough grade paper (P80) to remove the worst. Blow away particles with an airline/hairdryer. |
 |
| Mix the filler. We’re using U-Pol Easy 1 filler and T Filler hardener (they come in a kit with a spreader). Mix filler with hardener at 50:1 or, to put it another way, a golf-ball size of filler to a pea size of hardener. Mix with the spreader until it achieves a uniform colour and consistency |
 |
| Now you’ll need to work swiftly. Once mixed, the filler and hardener begin a reaction that renders the mix useless after roughly five minutes. Apply the filler in small amounts at first. You want a 5-6mm covering over the worst areas so you can sand it down into the desired shape. |
 |
| The filler will harden fully after 20-25 minutes. When it’s set, rub it down with 40-grade paper and a sanding block. Don’t apply too much pressure to begin with – 40-grade paper is harsh enough to rip the filler. Work gently until the area is flattened off. |
 |
| Once you’ve taken the rough edges off the filler with 40-grade paper, switch to a finer 80-grade. Fairing panels have very few completely flat surfaces, so you can create the curves by working the front or side edge of the sanding block into the filler to form the desired shape. |
 |
| Use the other side of the fairing, or its opposing panel, as a guide to shape. Feel the angle changes with the tips of your fingers and compare them with the area you’re shaping. Don’t panic if you end up removing too much filler though – you can always add more to correct mistakes. |
 |
| When you’re satisfied that the shape of the filler matches that of the original fairing, finish it off by rubbing it over with P180 paper. This will remove any large scratches from the filler and allow you to feather the edges of the filler into the surrounding surface. |
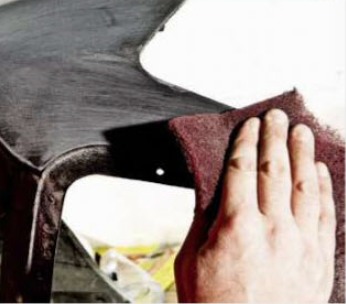 |
| Once you’ve smoothed the filler down, blast the fairing with air to completely remove any dust from the surface. The next step from here is to key the rest of the fairing/panel with Scotch brite in preparation for the application of primer. |
 |
| The nosecone is now ready for priming. Depending on your resto project, the next stage might be the application of primer to provide a good base for a smooth finish. A little prep now saves hours of remedial work when you get to the top coats. |