Wheels get scratched by tyre fitters, forgotten on the weekly clean, and have road crud, brake dust and chain lube thrown all over them. So it’s no surprise your wheels can easily start to look secondhand, letting your otherwise perfect bike down. But with a little work, and following the tips in this article about painting with spray cans, you can get them looking like new.

Paint your wheels costs less than you think, but it does take time – so it can be a perfect job for winter. You need to get the wheels off the bike, take off the tyres and discs, prep the surface and then paint. Once the paint has hardened, everything has to go back on. None of the jobs are very technical – unless you have the trouble we did removing our discs – but you need to be patient and thorough.
Tools for the Job ?
Front and rear paddock stand, sockets and Allen keys – also a friendly tyre-fitter for removing tyres. A tap set, wet and dry rubbing paper, brake cleaner, a Stanley blade, one can of etch primer, two cans of top coat and one of lacquer. Threadlock.
Cost : From £40
 |
| To avoid threading the nuts when you put everything back together, run a tap down the holes to clean the thread of any old thread locker or corrosion. This will help you to torque the new bolts up without damaging the thread. |
 |
| Before you start rubbing them down, check the wheels don’t need repairing. To do this use a paddock stand or axle stands to hold the spindle so you can spin and inspect the wheel for dings or bends. |
 |
| Our local bike shop removed the tyres for us so we could get to the paint around the sealing face – this helps prevent paint chipping off when you fit new tyres. Get any wheel weights off with a scraper or Stanley blade. |
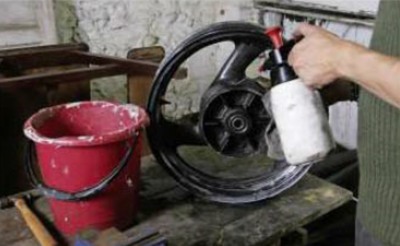 |
| Years of brake dust, chain lube and road grime needs to come off fully or it will block up your rubbing-down paper. Use a cotton rag for best results and if you have no brake cleaner, Gunk will work just as well. |
 |
| Aluminium wheels can corrode badly once water gets under the paint. Use a coarse-grade wet-and-dry paper on the bad sections, working down to 300 grit, otherwise you could flatten the rough finish. |
 |
| The next stages are similar to last painting article, except wheels are much more complicated shapes. Quite often a light coat of etch primer will help show up the areas that need more rubbing down. |
 |
| Get a light but thorough coat of etch primer onto the whole wheel. It’s best to do one side at a time so you can move the wheel to paint in the nooks and crannies, or paint it hanging on its spindle supported by a stand. |
 |
| With the etch coat dry, think about the route you’ll take with the top coat – paint the spokes first, then the hub and lastly the outer rim and lip. If you can paint it on the spindle you can spin the wheel while holding the can. |
 |
| With the top coat dry, a decent coat of clear lacquer can go on. This will give a glossy finish as well as a hard protective top coat. Once that’s right, leave for as long as you can before refitting the tyres and discs and slotting the wheels back into the bike. |